Writing numbers in French

Numbers in French are difficult.
As a native French speaker, I did not realized that at once. But when talking to foreign friends who were trying to learn French, I figured out how illogical and tricky is our way to numerate things.
Why do we say “four twenty eleven” for 91? Why 70 is said “sixty ten”? It can look quite weird…
This video from Numberphile (what a great website) is self-explanatory about how confusing French numbers are. It seems our weird way to count comes from ancient time when we used base 20.
Note that the way to count in Belgium or Switzerland seems to be far more logical since they get rid of the 70s and 90s with “septante” and “nonante” (vs “soixante-dix”=sixty-ten and “quatre-vingt-dix”=four-twenty-ten in France).

Even French are confused, especially when we need to write them down. It does not happen much, but when I do for writing checks, it is sometimes a bit painful. I often forget the rules and always go to this Wikipedia article. Should I put an “s”, should I put a dash…? I always need a refresh…

That is why I did this small application on Google app engine to help you writing French numbers. It is available in English and in French.

Screenshot French number webapp

Update from June 9 2013
Following cyChop valid comment, I updated the webapp with a radio button to enable switching between the traditional and modern spelling of numbers (following the reform of 1990).

Java source code generation and Maven

Imagine you are working on a project where you use some Java code generated from a tool.
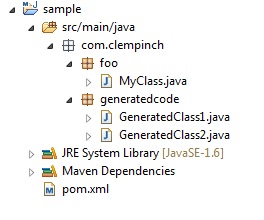
For the moment, you generate the code and integrate it yourself to the project:

Original Maven project structure

How would you automate this code generation step in your Maven build?

1. Create a separate Maven project where you will package the result of the code generation.

We package the result of the code generation in a separate JAR. Therefore, we need a different project structure.

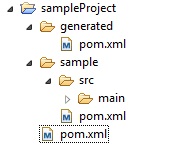
New Maven project structure

We create a parent project with two child Maven modules. One with the original code, the other where the generated code will be located.
The parent POM looks like this:

<project xmlns="http://maven.apache.org/POM/4.0.0" xmlns:xsi="http://www.w3.org/2001/XMLSchema-instance"
	xsi:schemaLocation="http://maven.apache.org/POM/4.0.0 http://maven.apache.org/xsd/maven-4.0.0.xsd">
	<modelVersion>4.0.0</modelVersion>
	<parent>
		<groupId>com.clempinch</groupId>
		<artifactId>myproject</artifactId>
		<version>0.0.1-SNAPSHOT</version>
	</parent>
	<groupId>com.clempinch</groupId>
	<artifactId>sample</artifactId>
	<version>0.0.1-SNAPSHOT</version>

	<dependencies>
		<dependency>
			<groupId>com.clempinch</groupId>
			<artifactId>generated-code</artifactId>
			<version>0.0.1-SNAPSHOT</version>
		</dependency>
	</dependencies>

</project>

2. Automate the code generation in Maven.

If a Maven plugin is not already provided to generate the source code, then you can probably use the Exec Maven plugin to do the job.

Here is the pom.xml of the code generation project (we assume you generate the code via a Java application – hence the use the exec:java plugin).

<project xmlns="http://maven.apache.org/POM/4.0.0" xmlns:xsi="http://www.w3.org/2001/XMLSchema-instance"
  xsi:schemaLocation="http://maven.apache.org/POM/4.0.0 http://maven.apache.org/xsd/maven-4.0.0.xsd">
  <modelVersion>4.0.0</modelVersion>
  <parent>
    <groupId>com.clempinch</groupId>
    <artifactId>myproject</artifactId>
    <version>0.0.1-SNAPSHOT</version>
  </parent>
  <groupId>com.clempinch</groupId>
  <artifactId>generated-code</artifactId>

  <dependencies>
    <!-- For generating source code -->
    <dependency>
      <groupId>com.clempinch</groupId>
      <artifactId>some-generation-jar</artifactId>
      <version>1.0.0</version>
      <scope>runtime</scope>
    </dependency>
  </dependencies>

  <build>
    <plugins>
      <plugin>
        <groupId>org.codehaus.mojo</groupId>
        <artifactId>exec-maven-plugin</artifactId>
        <executions>
          <execution>
            <id>generateCode</id>
            <phase>generate-sources</phase>
            <goals>
              <goal>java</goal>
            </goals>
            <configuration>
              <mainClass>com.clempinch.generation.MainClass</mainClass>
              <classpathScope>runtime</classpathScope>
              <sourceRoot>${project.build.directory}/generated-sources/main/java</sourceRoot>
            </configuration>
          </execution>
        </executions>
      </plugin>
      <plugin>
        <groupId>org.codehaus.mojo</groupId>
        <artifactId>build-helper-maven-plugin</artifactId>
        <executions>
          <execution>
            <id>addtoSourceFolder</id>
            <goals>
              <goal>add-source</goal>
            </goals>
            <phase>process-sources</phase>
            <configuration>
              <sources>
                <source>${project.build.directory}/generated-sources/generation_place</source>
              </sources>
            </configuration>
          </execution>
        </executions>
      </plugin>
    </plugins>
  </build>
</project>

3. Add the dependency to your initial project.

The pom.xml of the initial project needs to add a dependency to the generated-code JAR package:

<project xmlns="http://maven.apache.org/POM/4.0.0" xmlns:xsi="http://www.w3.org/2001/XMLSchema-instance"
	xsi:schemaLocation="http://maven.apache.org/POM/4.0.0 http://maven.apache.org/xsd/maven-4.0.0.xsd">
	<modelVersion>4.0.0</modelVersion>	
	<parent>
		<groupId>com.clempinch</groupId>
		<artifactId>myproject</artifactId>
		<version>0.0.1-SNAPSHOT</version>
        </parent>
	<groupId>com.clempinch</groupId>
	<artifactId>sample</artifactId>
	<version>0.0.1-SNAPSHOT</version>

	<dependencies>
		<dependency>
			<groupId>com.clempinch</groupId>
			<artifactId>generated-code</artifactId>
			<version>0.0.1-SNAPSHOT</version>
		</dependency>
	</dependencies>
</project>

4. Build the project from the parent POM.

mvn clean install

Now everything should be done automatically: the code generation and the build of the project.

Monitor an Active MQ queue with Hermes JMS

Hermes JMS is a great tool to monitor the activities on your JMS broker. Especially, it is quite useful to see what are the messages transiting in the queues and topics (you can also record them and replay them, which is pretty cool).

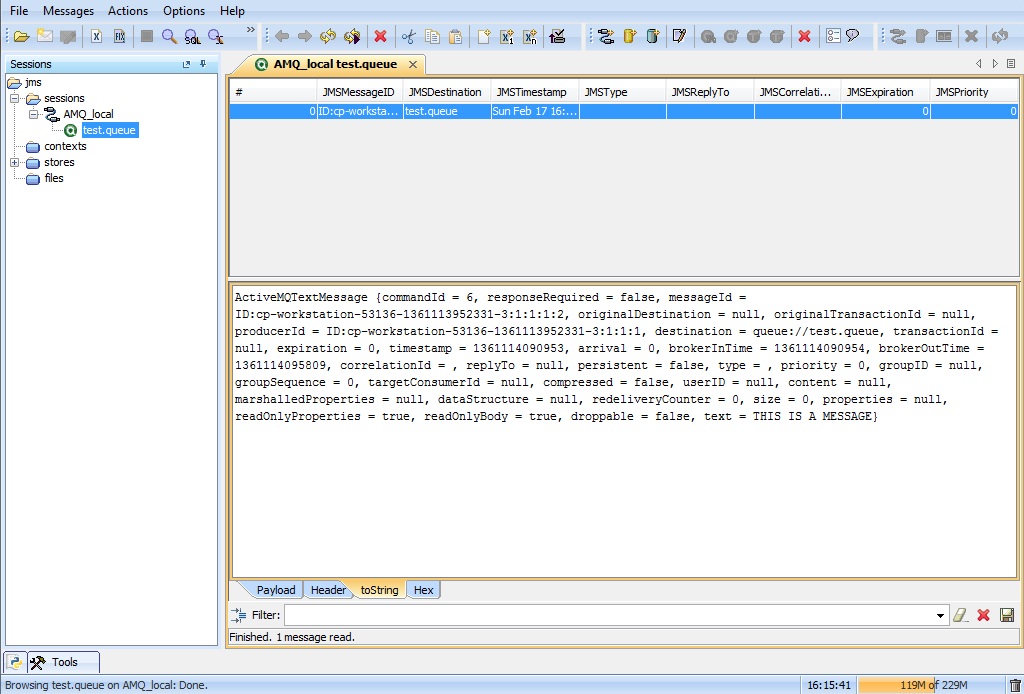
HermesJMS

However, when you are monitoring the messages transiting in a queue, Hermes JMS only takes a snapshot of what is pending, i.e. not yet delivered. That means that if you have a consumer plugged on this queue, you will barely see any message since they are immediately consumed as they are sent (most of the cases at least)… It is a problem when you want to see the flow of messages, record it and replay it.

Mirrored queues

I am using Apache ActiveMQ as a JMS Broker. My solution for this broker is to use mirrored queues.

This feature of ActiveMQ enables to route messages from one destination to another without any external interventions. So if we route messages from the queue we want to monitor to a topic, messages coming to the queue will be automatically sent to the topic. If we subscribe to this topic with Hermes JMS, then we are able to see all messages which have been sent to the original queue. Indeed, topics are easier to monitor with Hermes JMS. We see there the continuous flow of messages as they arrive.

How is this done in ActiveMQ? I requires very few configuration in your activemq.xml.

First you need to configure the broker instance as enabling virtual topics:

<broker brokerName="localhost" 
   useVirtualTopics="true" 
   dataDirectory="${activemq.data}" ... >

Then, if we assume the queue to monitor is called test.queue and if you want to route the messages to be routes to a topic called test.queue.mirror, you have to create a destination interceptor:

<destinationInterceptors>
	<virtualDestinationInterceptor>
		<virtualDestinations>
			<compositeQueue name="test.queue" forwardOnly="false">
				<forwardTo>
					<topic physicalName="test.queue.mirror"/>
				</forwardTo>
			</compositeQueue>
		</virtualDestinations>
	</virtualDestinationInterceptor>		
</destinationInterceptors>

Be sure the queue and topic destinations exists as well:

<amq:destinations>
	<amq:queue physicalName="test.queue"></amq:queue>
	<amq:topic physicalName="test.queue.mirror"></amq:topic>
</amq:destinations>

Back to Hermes JMS

Here we are! Restart ActiveMQ and you will notice that when you send a message to queue.test, this message is also sent to test.queue.mirror.

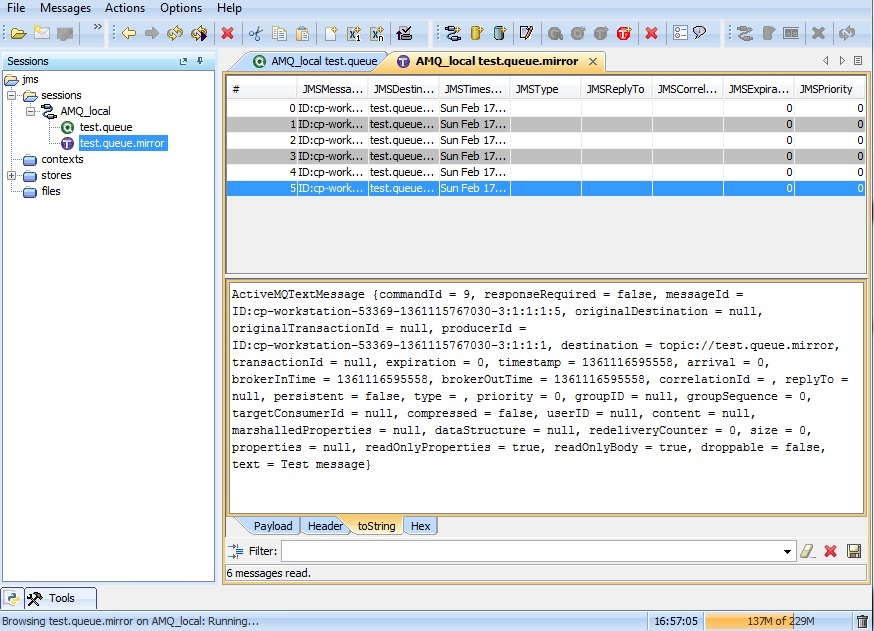
Start to Hermes JMS and connect to the topic: you see the flow of messages sent to the queue arriving.

Hermes JMS with mirrored queue

Problem with chapter number alignment in ToC in LaTeX

This post is about a very very specific problem in LaTex. I had hard time to figure out a way to solve this issue.

This problem is for people using the Memoir class.

When generating my PDF I noticed that by default when the number of chapter has more than 3 digits then, in the table of content, the place which should contain the chapter number is too small for the three digits. And this results in an ugly intersection with the chapter name.

This is the solution I found to correct the display. Put in the preamble of the document, the following code:

\makeatletter
\let\oldchapternumberline\chapternumberline
\renewcommand\chapternumberline[1]{#1\hspace*{1em}}
\renewcommand\cftchaptername{\chaptername~}
\addtolength\cftchapternumwidth{3em}
\makeatother

This basically redefines how a line in the ToC is done. But this code has a problem: after the chapter number, it put a fixed space and then the chapter name. The chapter name will therefore not be aligned across the ToC (at least we have the problem when the chapter number increases its number of digits).

For me, this is indeed fair enough. I did not find a better solution which works so if you do find one, I would be glad to hear it: please leave a comment!